Monday, March 18, 2013

DIY Sand and Gravel filter finished!


Got my S/G filter finished and up and running.  I built this for my indoor Koi Stock tank, which will eventually serve as my quarantine tank when the big pond gets finished.  Right now it has my 3 Koi and one goldfish in there.  My old filter was failing and leaking really bad, I had used it for over 10 years, it use to be on my old outdoor pond and it was really undersized for my fast growing Koi.  I was able to use the bio media that was in it for a new shower water return as you will see in the video.  So far, no leaks and the water is sparkling clear after only 2 days in operation.  I will be building 2 more of these for my outdoor pond, so this was a good practice one.  I make a video of how to clean it next weekend!  Stay tuned!

Cheryl

Tuesday, January 8, 2013

Greenhouse cover for indoor pond

I decided I needed a cover for my indoor Koi tub, with the garage being unheated and the water being heated it was causing a lot of condensation throughout the garage.
 
I built it out of 1/2" PVC, I told Craig about my idea, I even drew it out, but until we got it somewhat built he didn't get what I was saying, but it came together exactly like I had planned. The whole thing cost less than $20.00.  I used three 4-way T's, 8 elbows and 8 1 1/2" T's with a 1/2" outlet for the legs, they are cut in half so they rest perfectly around the edges of the tub and I just threw a painters tarp over the top.  It is like a rainforrest in there now.
 
I didn't glue it so I could disassemble it when I am not using it.  I need to build a new filter, the one I have been using is from the old pond and it developed a huge crack in the lid several years ago, I used some of the plastic to seal it, but it is now leaking out of the sides.  I think my pump is just too powerful for it and the pressure inside it is immense.  But fish have grown like crazy and seem really happy, they take turns swimming into the current from the filter.  Water is holding steady at about 73 degrees.
 
Posted by Picasa

Sunday, November 25, 2012

The pond is filling up and I'm not ready!

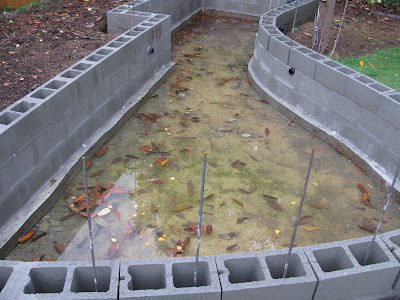
Well, we have had a bit of rain lately and I went out to see how the pond was doing and was suprised to see several inches of water in the bottom.
 
Especially since it doesn't have a bottom yet, just dirt.
 
The nice thing is, is that I can see that I got my footings really level.
 
I am so anxious to get working on it again, but not in this kind of weather.
You can also see it has a lot of leaves in it, well, those Laurel bushes will be gone after the pond is complete and there will be a fence in its place.

I went out on Black Friday to the pond store in Redmond and picked up my two skimmer units at half off, basically BOGO.  Little by little I am getting my parts together, right now on my wish list is an AquaForte Ultra Sieve III, http://www.dreampond.com/ultra-sieve-iii-gravity-fed-pre-filter.html Most places I have found it have it for $1799.00 but this place has it for $1399.00, still a lot of money, but it will be an essential piece of my pond filteration and the most expensive piece.  I am collecting my pennies again for that one.
Posted by Picasa

Sunday, October 7, 2012

Course three is 3/4 finished

I just have about 13 more cinder blocks left to set on the curved portion of the wall, the spaces between the blocks to fill in and course 3 will be complete!  Almost half way done!
 
The area where the blocks are set in, in the picture below are now as tall as they will be, I will pour a pad of concrete behind them to the same height and then continue the back wall with the 4th course to line up with the farther back wall, this will give me a shelf for plants.
 
You can see my TPR's (tangetial pond returns) in the pictures, I have a total of 7 of them, they help circulate the water and push debris toward the bottom drains.
 
and speaking of bottom drains, I got them ordered and they are on their way, so I will be digging once again.  Our grass could not be more dead, we still have had no rain and our weather has been just amazing, the best fall weather I can ever remember.
 
Posted by Picasa

Moved the fish indoors for the winter

I found a 300 gallon rubbermaid tub on craigslist for a great price, ($195.00), it had only been used twice for baptisms, (kind of odd I thought) but anyway I moved my goldfish and Koi into it today.
 
I took some pictures of them before I let them out. They are best buddies, the goldfish is my one surviving fish from the old pond, he has been through a lot, he most likely was born in there.
 
I don't know what kind of Koi this is, but he is a butterfly Koi, other than that I don't know, I picked him up at the fish store earlier in the spring to keep the goldfish company.
 
Craig was worried that the cats would fall in the tub and drown so he made a bridge for them to jump onto, so far they have showed no interest in it, I also have netting over it to keep the fish from jumping out.
 
Here you can kind of see the fish after I let them out, this is huge compared to what they were in before.  Once I get the big pond done they will get to be the first inhabitants and then I will use this for a quarantine/sick tank.
 
Posted by Picasa

Sunday, August 26, 2012

Pond walls are going up........slowly!

I'm about half way through mortaring my second course of cinder blocks, I would never make it as a Mason, I'm too slow and it is so hard, I ache all over.  Craig cut my rebar and as soon as I finish the second course I will set them in place permanently. 
 
The back wall to the left will only be one more course higher and then I will pour another cement slab right behind it and continue the back side straight across to line up with the right side in the back, this will be my plant shelf, in the center will be the waterfall.  There will also be a pond window to the right of the sharp curve in the front where it straightens out.
 
Posted by Picasa

Sunday, August 12, 2012

Small progress on the pond

I got my cinder blocks placed where I wanted them and marked where I want to put the vertical rebar, Craig drilled the holes in the footings for me today, luckily we had a hammer drill and the right size bit.   Next I will morter the first course of blocks and then I will place the rebar in the holes and set them with epoxy.


Posted by Picasa